After painting on black french tips, I was suddenly reminded of the classic computer game, PacMan - after wondering how to incorporate this idea into a manicure for a while, I took the plunge and turned it into a PacMan "funky french"!
I started with three coats of Miss Sporty Et Voila French Manicure Pink, and waited for it to dry completely before applying scotch tape, leaving the tips exposed. I then painted the tips with Claire's Black Polish, and removed the tape immediately to ensure that the lines were crisp. I added a blue line to the very tip using a blue Nail Art Pen from Ebay. Using a white pen, I then added small white dots, and painted the ghost shape in white. I painted over the white ghost shapes once they were dry, using a dotting tool and China Glaze Papaya Punch (Orange), Barry M Turquoise (blue), Barry M Red (red) and Models Own Pastel Pink (pink). After adding the eyes with Claire's Black and White Nail Art Pen, I added a coat of Seche Vite. Done!
I had this on for a couple of days, it was a good laugh! Basically the first "funky french" I've ever attempted, as I wasn't sure I really liked the whole 'look' of them - but this was cool :D I did have a PacMan on the thumb, but smudged it before I could take the pictures unfortunately...what a diiiick!
Let me know what you think guys! Don't forget about my Apothica $25 Giveaway! You've still got 1 week to enter!
xxx
Showing posts with label Claire's. Show all posts
Claire's Bedazzled + Sally Hansen The Real Teal
July 15, 2011
I have seen Claire's Bedazzled all over blogs. I fell in love with it... so of course, I bought it!!! I mean who wouldn't....I can't believe how awesome this polish is. All the other blogs were right--the pictures do not do this polish justice.
I paired mine with Sally Hansen The Real Teal (which happened to stain my nails). Before removing the manicure, I had to see what a konad stamp would look over it, so I have pictures of that too. In addition, I loved this Claire's polish so much I had to see what it looked like as a french tip. The base coat for that manicure is Konad Regular Polish in Light Silver. In those pictures you will notice that my ring finger is entirely covered with Claire's bedazzled--that's because I wanted to see what the polish looked like thick. Overall, this polish is AWESOME!
Outside

Inside no flash

Outside

Outside in the shade

Outside
Inside No Flash

Outside in the shade

Outside

Inside No Flash

I am not fond of the pictures to follow....These were taken inside with the flash on.
Scotch Tape Zebra Print Manicure
Hello everyone! I know, two posts in as many days, almost like the good old days eh?!
When I was on holiday with my family, we had a very restricted weight allowance for the flights, and so we ditched all the heavy beach gear in favour of lighter alternatives. This included picking up some cheap, light beach towels from Asda, and my, ever tasteful, father chose the most trashy-fabulous, attention grabbing, lurid print that was available - zebra print with a bright purple border. They were amazing. And chavvy. But mostly amazing. They inspired this manicure!
I started with a base of 3 coats of Natural Collections White and allowed to dry before stamping the zebra image from Konad M57 with Konad Special Polish in Black. If you're in the UK, and don't want to splash out for the Konad special Polish, I've heard that MUA Shade 2 - available for only £1 in Superdrug - is a fantastically opaque alternative, though I've yet to try it myself. I added a coat of Seche Vite to dry it all quickly, and ten minutes later added strips of scotch tape diagonally across each nail. I then painted the nail in Claire's Matte Purple (I LOVE mixing textures!) and pulled the tape away while still wet. ET VOILAAA! Trashy Towel Nails.
When I was on holiday with my family, we had a very restricted weight allowance for the flights, and so we ditched all the heavy beach gear in favour of lighter alternatives. This included picking up some cheap, light beach towels from Asda, and my, ever tasteful, father chose the most trashy-fabulous, attention grabbing, lurid print that was available - zebra print with a bright purple border. They were amazing. And chavvy. But mostly amazing. They inspired this manicure!
I started with a base of 3 coats of Natural Collections White and allowed to dry before stamping the zebra image from Konad M57 with Konad Special Polish in Black. If you're in the UK, and don't want to splash out for the Konad special Polish, I've heard that MUA Shade 2 - available for only £1 in Superdrug - is a fantastically opaque alternative, though I've yet to try it myself. I added a coat of Seche Vite to dry it all quickly, and ten minutes later added strips of scotch tape diagonally across each nail. I then painted the nail in Claire's Matte Purple (I LOVE mixing textures!) and pulled the tape away while still wet. ET VOILAAA! Trashy Towel Nails.
I love how the shiny and the matte finishes look together. The cameras playing tricks on your eyes, the purple is, in fact, a lot more violet and red toned in real life, my camera is in perfect, purple denial, turning it blue. The photos were also taken at dusk, so sorry they're a bit dark and blue. (gawd I need to build myself a light box!)
Let me know what you think everyone! :D
Labels:
Animals,
Claire's,
Inspired Manicures,
konad,
Konadicure,
M57,
Matte,
purple,
ScotchTape,
Seche,
White,
zebra
Dragon Fly Nail Art
July 07, 2011
You can click on any picture to enlarge.
This manicure was simple but fun. I used three coats of Claire's Lilac Shimmer Rose Polish as a base coat (click the link to view online). The polish color was hard to capture on camera because the sun kept washing out my hand and almost made it appear as if I wasn't wearing a polish at all. I was able to capture the color in some pictures. The polish has a pearly, shimmery appearance to it.
Then I just applied the SuperNail Dragonflies Appliques I got from Sally's Beauty Supply (click here to view online). When I placed the dragonfly accessory on my nail I made it have a 3D effect on purpose. I wanted it to look like the dragonfly was actually "flying". I could have made the accessory flush with my nail as if it was a sticker or a stamp. Because I change my polish often, I wanted the wings to be raised. So what do you think of it?
Here are some more photos...
Crazy weirdness!!!
Click on the pictures to enlarge them so you can hopefully see the detail of the polish..
So the other day, I went to Claire's and found this really neat polish. Has anyone ever seen this type of polish before? I wish I had a better picture that really shows all the colors. It was night time when I tried out the polish the other day, so didn't have natural sunlight. This polish has so many colors mixed into one. The orange and yellow colors over power the green and pink polish toward the bottom of the bottle. I assume once I get to the bottom/middle of the bottle, I will see more of the green and pink. Can you see the mixture of colors in these pictures? I just thought this polish was neat. It has a natural semi matte finish. It is not shiny.
Nails Inc Mix and Match - Girly Turquoise Skittles
I think I must be on a turquoise kick! I won a years supply of Nails Inc polishes by entering the Tiger Mani into InStyle Magazine's Nail Art contest, and Haymarket - the polish I used today - was one of twelve that were sent as a prize! (Not quite a years supply for me, but it's still a great prize haha!)
I started with two coats of Haymarket, a muted, dusky turquoise - more blue-toned than green. You can't beat Nails Inc on quality, you get what you pay for, as these retail at £11 a pop - not something I can usually afford!
I added a different design to each nail, aside from the polka dots, which were added using Konad plate M79 with Konad White Special Polish, I used a paint brush for the details.
The pink polish on the accent nail bow, index and thumb is Collection 2000 Candy Floss, the silver is a Claire' Nail Art Pen and the white is Natural Collection from Boots.
Clearly a design for when you can't make your mind up! I quite like that it's all mixed up,it's very girly, all that's missing is hello kitty - as my mum said.
I promise I will get back to posting more regularly!
xxxx
I started with two coats of Haymarket, a muted, dusky turquoise - more blue-toned than green. You can't beat Nails Inc on quality, you get what you pay for, as these retail at £11 a pop - not something I can usually afford!
I added a different design to each nail, aside from the polka dots, which were added using Konad plate M79 with Konad White Special Polish, I used a paint brush for the details.
The pink polish on the accent nail bow, index and thumb is Collection 2000 Candy Floss, the silver is a Claire' Nail Art Pen and the white is Natural Collection from Boots.
Clearly a design for when you can't make your mind up! I quite like that it's all mixed up,it's very girly, all that's missing is hello kitty - as my mum said.
I promise I will get back to posting more regularly!
xxxx
Labels:
Claire's,
konad,
M79,
Mix and Match,
Nail Art Pen,
Nails Inc,
Polka dots,
ruffian half moon,
Skittles,
stripes,
Turquoise
Tiger Nails - Tutorial!
Well, my exams are finally over! Wooooohooooo!!!! Back to regular posts! I promised I'd be back on form with the nail art, with a bang, so today I've got a tutorial for you, for FIERCE tiger nails!
Next, take a green, pink, grey and brown polish . with a dotting tool or brush, add two green dots to the bottom of your white sponged eye areas, and with the pink polish, draw a 'T' shape towards the nail edge. Contour the tiger's nose with two fine lines in brown polish. I added some grey whiskers with a fine brush.
I hope you like them! Let me know what you think! Will you be trying it?
*EDIT* Because this post took BLOOMIN' AGES, I completely forgot to mention the reason I did this manicure in the first place! I knew Swaffie Blog was having an "inspired" competition, and I really wanted to enter. I was watching a documentary on endangered species, and decided to let the segment on Bengal Tigers be my inspiration! Here is the link to the competition, you can vote for me if you want my love and affection forever and ever and ever, I would really appreciate it :D:D. I am entry number 3! There are some fantastic entries, and you can vote for your favourite three, which I think is a great way of doing it, giving everyone a fair chance! :D
This looks complicated, but its really very easy when you break it down into steps! For the base of the tiger print design, I used the sponging technique to make a colour gradient. The only piece of equipment you will need for this, is a piece of sponge, I use the corner of a kitchen scrubber:
Select 3 polishes in "tiger" colours - I am using Nails Inc Candy Orange , Essence Show Your Feet in Juicy Orange, and Miss Sporty Taxi:
I started with the middle shade, Candy Orange, and sponged on the darker shade, Juicy Orange, onto differing areas of the nail. It works best if you dab a small amount of polish onto the sponge, and lightly build up the sponged area, adding a little bit at a time. I then did the same with the yellow, Taxi, and these are the results:
After cleaning up the cuticles with a cotton bud and nail polish remover:
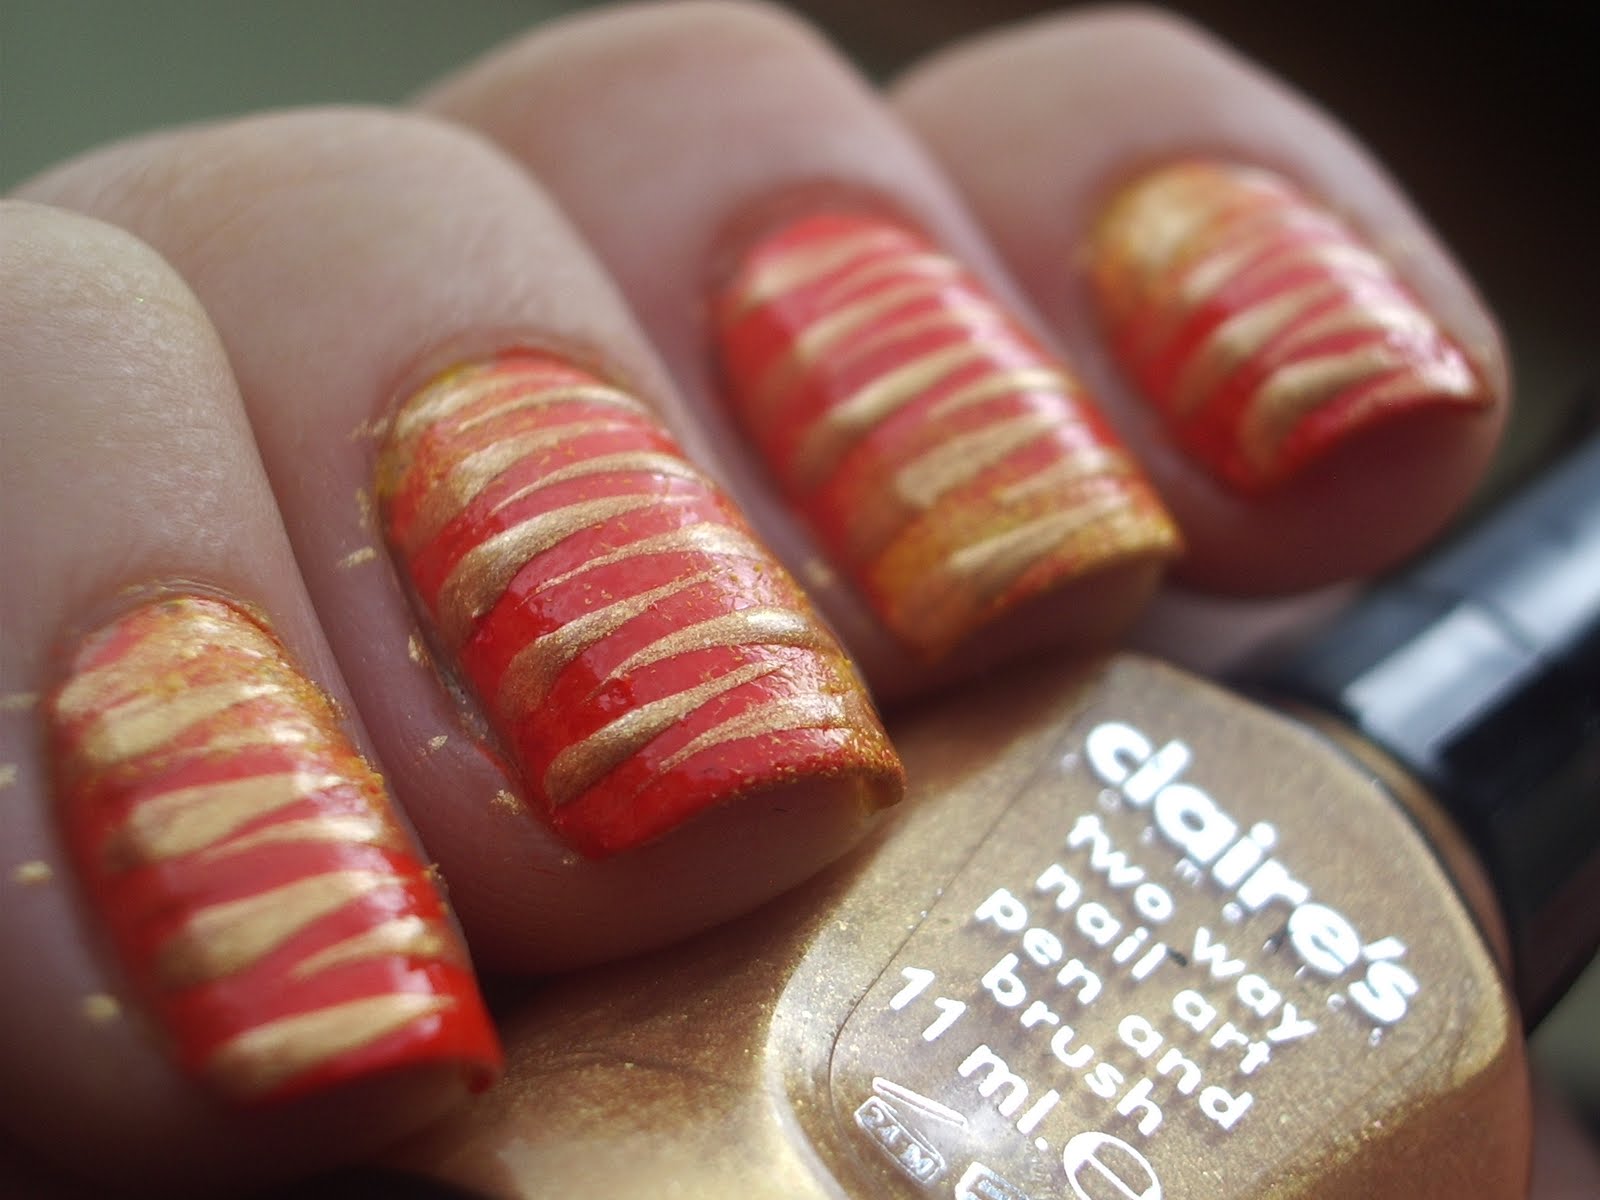
Next comes the stripes, I did two sets of stripes in black and gold, but you could just do the black if you wanted. I used Claire's Nail Art Pens in Black and Gold (the striping brushes inside), but you could easily use a striping brush or regular brush and polish if you don't have pens:
get a small bead of polish on the end of the brush, and starting at the nail edge, draw horizontal stripes that don't touch, but interlock to make the tiger print, zig zag pattern. It works best if you almost flick the striper towards the centre of the nail, as it makes a neat, tapered point. Start with the Gold stripes.
Once it's dry, you can go back with the Black striper, almost exactly on top of your gold stripes:
Add a coat of Seche Vite or your favourite topcoat, and you're done! I added the tiger face as an accent on the ring finger. Take an eyeshadow applicator (as the sponge is smaller and denser!) and add a small amount of white polish. Dab on the orange base like so:
Next, take a green, pink, grey and brown polish . with a dotting tool or brush, add two green dots to the bottom of your white sponged eye areas, and with the pink polish, draw a 'T' shape towards the nail edge. Contour the tiger's nose with two fine lines in brown polish. I added some grey whiskers with a fine brush.
All that's left to add is the black details, for which I used Claire's Black Nail Art Pen. Add your topcoat. You're all finished! Longest. Tutorial. Ever! Rest your tired eyes.
xxx
Subscribe to:
Posts (Atom)