After painting on black french tips, I was suddenly reminded of the classic computer game, PacMan - after wondering how to incorporate this idea into a manicure for a while, I took the plunge and turned it into a PacMan "funky french"!
I started with three coats of Miss Sporty Et Voila French Manicure Pink, and waited for it to dry completely before applying scotch tape, leaving the tips exposed. I then painted the tips with Claire's Black Polish, and removed the tape immediately to ensure that the lines were crisp. I added a blue line to the very tip using a blue Nail Art Pen from Ebay. Using a white pen, I then added small white dots, and painted the ghost shape in white. I painted over the white ghost shapes once they were dry, using a dotting tool and China Glaze Papaya Punch (Orange), Barry M Turquoise (blue), Barry M Red (red) and Models Own Pastel Pink (pink). After adding the eyes with Claire's Black and White Nail Art Pen, I added a coat of Seche Vite. Done!
I had this on for a couple of days, it was a good laugh! Basically the first "funky french" I've ever attempted, as I wasn't sure I really liked the whole 'look' of them - but this was cool :D I did have a PacMan on the thumb, but smudged it before I could take the pictures unfortunately...what a diiiick!
Let me know what you think guys! Don't forget about my Apothica $25 Giveaway! You've still got 1 week to enter!
xxx
Showing posts with label Nail Art Pen. Show all posts
Nails Inc Mix and Match - Girly Turquoise Skittles
I think I must be on a turquoise kick! I won a years supply of Nails Inc polishes by entering the Tiger Mani into InStyle Magazine's Nail Art contest, and Haymarket - the polish I used today - was one of twelve that were sent as a prize! (Not quite a years supply for me, but it's still a great prize haha!)
I started with two coats of Haymarket, a muted, dusky turquoise - more blue-toned than green. You can't beat Nails Inc on quality, you get what you pay for, as these retail at £11 a pop - not something I can usually afford!
I added a different design to each nail, aside from the polka dots, which were added using Konad plate M79 with Konad White Special Polish, I used a paint brush for the details.
The pink polish on the accent nail bow, index and thumb is Collection 2000 Candy Floss, the silver is a Claire' Nail Art Pen and the white is Natural Collection from Boots.
Clearly a design for when you can't make your mind up! I quite like that it's all mixed up,it's very girly, all that's missing is hello kitty - as my mum said.
I promise I will get back to posting more regularly!
xxxx
I started with two coats of Haymarket, a muted, dusky turquoise - more blue-toned than green. You can't beat Nails Inc on quality, you get what you pay for, as these retail at £11 a pop - not something I can usually afford!
I added a different design to each nail, aside from the polka dots, which were added using Konad plate M79 with Konad White Special Polish, I used a paint brush for the details.
The pink polish on the accent nail bow, index and thumb is Collection 2000 Candy Floss, the silver is a Claire' Nail Art Pen and the white is Natural Collection from Boots.
Clearly a design for when you can't make your mind up! I quite like that it's all mixed up,it's very girly, all that's missing is hello kitty - as my mum said.
I promise I will get back to posting more regularly!
xxxx
Labels:
Claire's,
konad,
M79,
Mix and Match,
Nail Art Pen,
Nails Inc,
Polka dots,
ruffian half moon,
Skittles,
stripes,
Turquoise
Tiger Nails - Tutorial!
Well, my exams are finally over! Wooooohooooo!!!! Back to regular posts! I promised I'd be back on form with the nail art, with a bang, so today I've got a tutorial for you, for FIERCE tiger nails!
Next, take a green, pink, grey and brown polish . with a dotting tool or brush, add two green dots to the bottom of your white sponged eye areas, and with the pink polish, draw a 'T' shape towards the nail edge. Contour the tiger's nose with two fine lines in brown polish. I added some grey whiskers with a fine brush.
I hope you like them! Let me know what you think! Will you be trying it?
*EDIT* Because this post took BLOOMIN' AGES, I completely forgot to mention the reason I did this manicure in the first place! I knew Swaffie Blog was having an "inspired" competition, and I really wanted to enter. I was watching a documentary on endangered species, and decided to let the segment on Bengal Tigers be my inspiration! Here is the link to the competition, you can vote for me if you want my love and affection forever and ever and ever, I would really appreciate it :D:D. I am entry number 3! There are some fantastic entries, and you can vote for your favourite three, which I think is a great way of doing it, giving everyone a fair chance! :D
This looks complicated, but its really very easy when you break it down into steps! For the base of the tiger print design, I used the sponging technique to make a colour gradient. The only piece of equipment you will need for this, is a piece of sponge, I use the corner of a kitchen scrubber:
Select 3 polishes in "tiger" colours - I am using Nails Inc Candy Orange , Essence Show Your Feet in Juicy Orange, and Miss Sporty Taxi:
I started with the middle shade, Candy Orange, and sponged on the darker shade, Juicy Orange, onto differing areas of the nail. It works best if you dab a small amount of polish onto the sponge, and lightly build up the sponged area, adding a little bit at a time. I then did the same with the yellow, Taxi, and these are the results:
After cleaning up the cuticles with a cotton bud and nail polish remover:
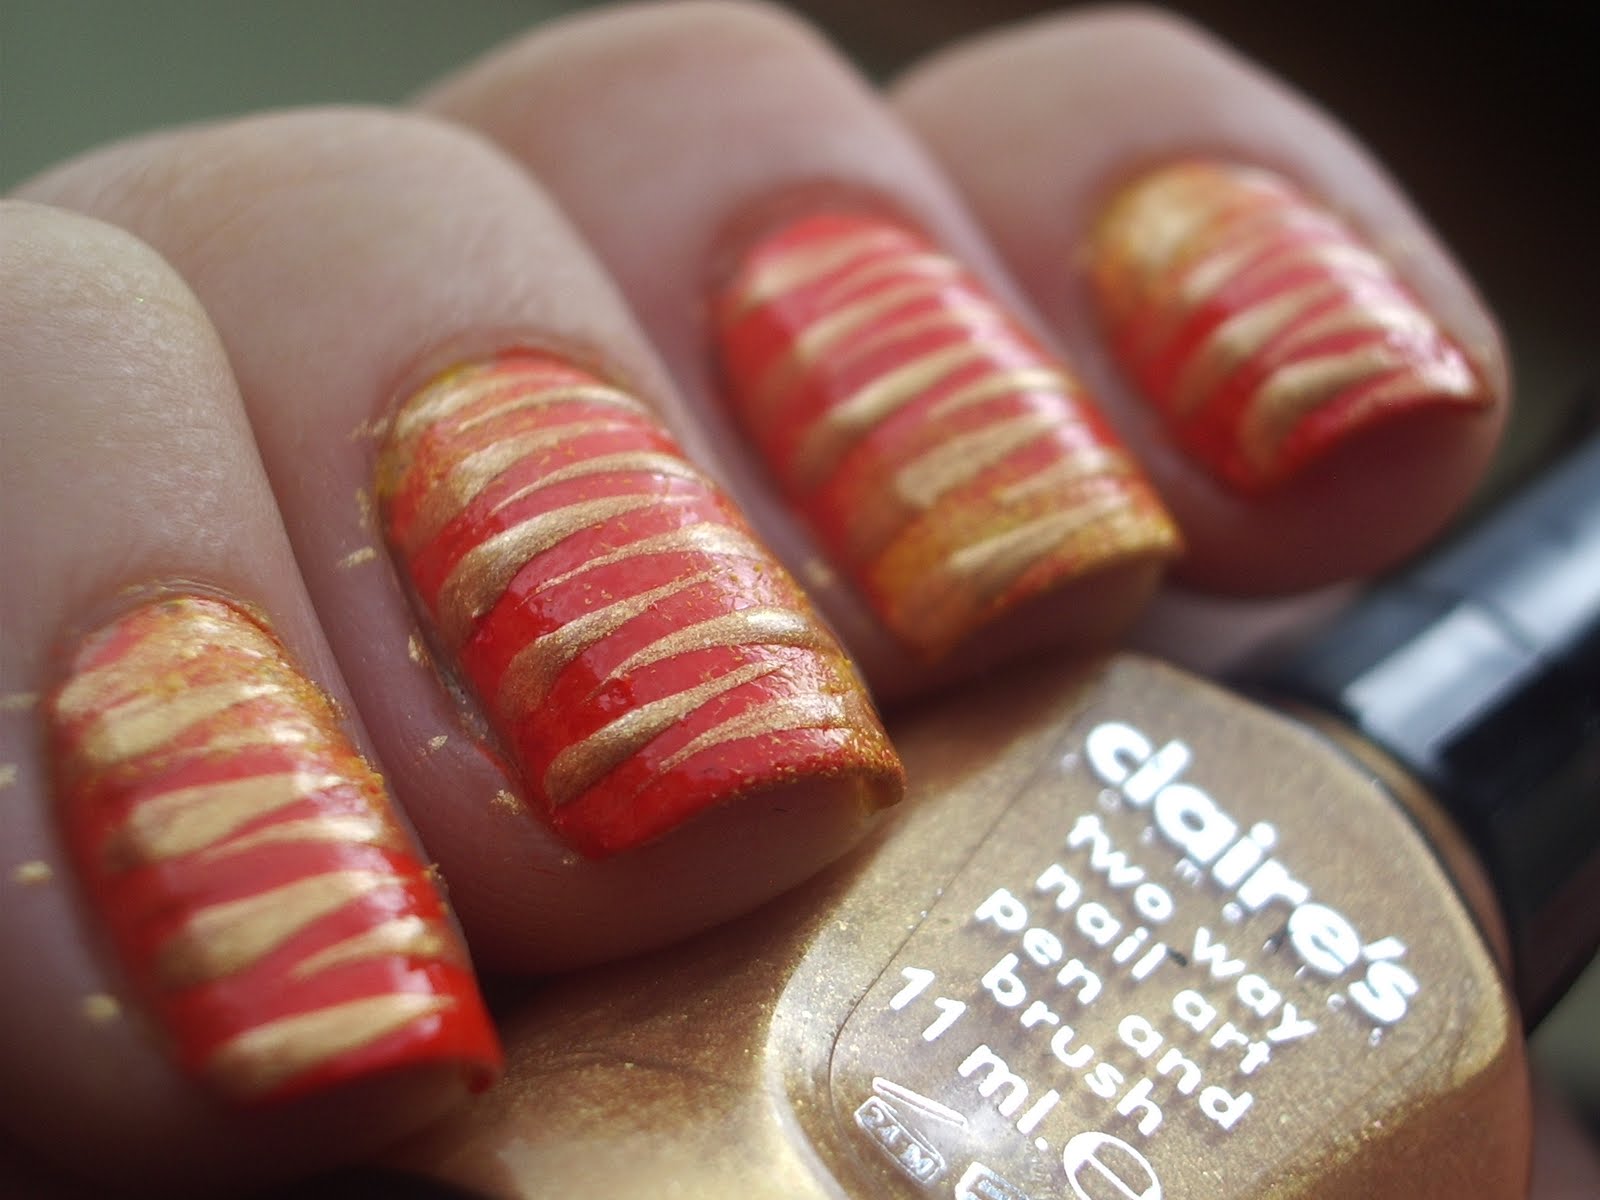
Next comes the stripes, I did two sets of stripes in black and gold, but you could just do the black if you wanted. I used Claire's Nail Art Pens in Black and Gold (the striping brushes inside), but you could easily use a striping brush or regular brush and polish if you don't have pens:
get a small bead of polish on the end of the brush, and starting at the nail edge, draw horizontal stripes that don't touch, but interlock to make the tiger print, zig zag pattern. It works best if you almost flick the striper towards the centre of the nail, as it makes a neat, tapered point. Start with the Gold stripes.
Once it's dry, you can go back with the Black striper, almost exactly on top of your gold stripes:
Add a coat of Seche Vite or your favourite topcoat, and you're done! I added the tiger face as an accent on the ring finger. Take an eyeshadow applicator (as the sponge is smaller and denser!) and add a small amount of white polish. Dab on the orange base like so:
Next, take a green, pink, grey and brown polish . with a dotting tool or brush, add two green dots to the bottom of your white sponged eye areas, and with the pink polish, draw a 'T' shape towards the nail edge. Contour the tiger's nose with two fine lines in brown polish. I added some grey whiskers with a fine brush.
All that's left to add is the black details, for which I used Claire's Black Nail Art Pen. Add your topcoat. You're all finished! Longest. Tutorial. Ever! Rest your tired eyes.
xxx
Daisy, Daisy.
I picked up a couple of BeautyUK polishes this week, here is shade 41, Soft Lilac
It's a lovely, muted lilac cream, maybe a little pinker than this suggests, a bit patchy in the first two coats, but it evened out really nicely with the third coat. This photograph is without topcoat - it's SO SHINY. It applies really smoothly and dried very quickly. At £1.99 for 9ml, these are good quality and well worth it - I will definitely be buying more, the colour selection is excellent!
I freehanded in some little white and gold daisies using Claire's Nail Art Pens
Using the white pen, I made 5 small dots in a circle, then added a gold dot to the middle, to make the daisies.
A nice look for Spring! The other shade I bought was Soft Green. What do you think? Have you tried Beauty UK's nail polishes?
It's a lovely, muted lilac cream, maybe a little pinker than this suggests, a bit patchy in the first two coats, but it evened out really nicely with the third coat. This photograph is without topcoat - it's SO SHINY. It applies really smoothly and dried very quickly. At £1.99 for 9ml, these are good quality and well worth it - I will definitely be buying more, the colour selection is excellent!
I freehanded in some little white and gold daisies using Claire's Nail Art Pens
Using the white pen, I made 5 small dots in a circle, then added a gold dot to the middle, to make the daisies.
A nice look for Spring! The other shade I bought was Soft Green. What do you think? Have you tried Beauty UK's nail polishes?
Stars, Skulls, Swirls, Sponging and Stamping. (Giveaway Winner, too)
God, I love it when an alliterative post title comes together.
The whole shabang for you today, I went a little stamp crazy...
Please ignore the smudge-tasic index finger! After all that work, there was no way I was re-doing it haha!
I'd been wanting to use the Skull image from the new Bundle Monster Image Plate set for a while, but was in danger of utilizing it to create some kind of gross emo-dream/Pirates of the Caribbean tribute! I decided, in the end, to keep the colours light, and add some swirly pattern and some stars :D
I started with a base of Barry M Turquoise, and sponged on Models Own Blooboo in differing places on the nail. I then repeated this with Silver, from Claire's Silver Nail Art Pen. Now, I've mentioned this before, but however wonderful this silver is (and it is), it gives you the WORST glitter herpes ever. You can scrub and scrub at your silver-stained cuticles but it Just. Won't. Go. Away. So, I apologise for the sparkly cuticles haha! I also added a little bit of Rimmel Sky High to the sponged base too :)
After adding a coat of Seche Vite to smooth it out, I stamped the swirly, planty image from BM225 using Konad White Special Polish onto different parts of each nail. Then, using THIS method, I mixed my own pastel Special Stamping Polishes and stamped some pink, green and purple Skulls from plate BM211. I then did the same with the Star image from BM206, adding them sporadically to make a pattern. I added some coloured rhinestones to the Skull eyes (a later addition - I liked it without, too) that you can get from Nail Art online store Born Pretty.
If people like this look, I may do a sponging/stamping tutorial, because it looks rather busy and difficult, but it's really very simple, when you know how!
Also, I'm going to quickly announce the Giveaway winner (I know it's been a long time coming, soorrryryyyy).
I have contacted her and she's accepted, the winner is...
Lily over at Beauty's Bad Habit!
Congratulations! I'll be posting your goodies after my exams (next week :D)
I used Random.org to select a random number, then simply found that numbered entry in my spreadsheet!
(Didn't want to include your email, Lily!)
So, there we are! My first Giveaway, over and done with! As you can see I had a colossal amount of entries, so they took a while to verify - thank you for your patience, and for entering in the first place!
I hope you enjoy your prize Lily, check out her blog Beauty's Bad Habit!
I also got some great feedback from the giveaway question "What would you like to see from me in the future", so I'll be sharing some of the suggestions with you soon!
Thanks Everyone!
The whole shabang for you today, I went a little stamp crazy...
![]() |
| All photos in natural light |
I'd been wanting to use the Skull image from the new Bundle Monster Image Plate set for a while, but was in danger of utilizing it to create some kind of gross emo-dream/Pirates of the Caribbean tribute! I decided, in the end, to keep the colours light, and add some swirly pattern and some stars :D
I started with a base of Barry M Turquoise, and sponged on Models Own Blooboo in differing places on the nail. I then repeated this with Silver, from Claire's Silver Nail Art Pen. Now, I've mentioned this before, but however wonderful this silver is (and it is), it gives you the WORST glitter herpes ever. You can scrub and scrub at your silver-stained cuticles but it Just. Won't. Go. Away. So, I apologise for the sparkly cuticles haha! I also added a little bit of Rimmel Sky High to the sponged base too :)
After adding a coat of Seche Vite to smooth it out, I stamped the swirly, planty image from BM225 using Konad White Special Polish onto different parts of each nail. Then, using THIS method, I mixed my own pastel Special Stamping Polishes and stamped some pink, green and purple Skulls from plate BM211. I then did the same with the Star image from BM206, adding them sporadically to make a pattern. I added some coloured rhinestones to the Skull eyes (a later addition - I liked it without, too) that you can get from Nail Art online store Born Pretty.
If people like this look, I may do a sponging/stamping tutorial, because it looks rather busy and difficult, but it's really very simple, when you know how!
Also, I'm going to quickly announce the Giveaway winner (I know it's been a long time coming, soorrryryyyy).
I have contacted her and she's accepted, the winner is...
Congratulations! I'll be posting your goodies after my exams (next week :D)
I used Random.org to select a random number, then simply found that numbered entry in my spreadsheet!
(Didn't want to include your email, Lily!)
So, there we are! My first Giveaway, over and done with! As you can see I had a colossal amount of entries, so they took a while to verify - thank you for your patience, and for entering in the first place!
I hope you enjoy your prize Lily, check out her blog Beauty's Bad Habit!
I also got some great feedback from the giveaway question "What would you like to see from me in the future", so I'll be sharing some of the suggestions with you soon!
Thanks Everyone!
Labels:
Barry M,
Blue,
BM206,
BM211,
BM225,
Born Pretty Store,
BundleMonster,
giveaway,
Gradient,
konad,
Konadicure,
Model's Own,
Nail Art Pen,
Pastels,
Rhinestones,
Rimmel,
Silver,
Sponging
She's My Cherry Pie
If you haven't been over to www.bornprettystore.com, seriously, check it out! I get a lot of my nail art supplies from there (my brushes, rhinestones, fimo canes etc), because they are so affordable, and it's free international shipping - always a bonus! They often run little contests and give away freebies too, which is great - they're a really customer-friendly company with a wide range of supplies.
I was sent some of their heart-shaped rhinestones to try out,* and was struggling to think of a design to incorporate them into. I've wanted to do a Manicure along these lines for a while, using cherries, and thought I may as well use some of the red heart rhinestones :D
I started with a base of American Apparel Palm Springs, a lovely peach nude, and used a dotting tool to add some red dots in Boots 17 Knockout Red. I added some highlights and shading with Nails Inc Shoreditch High Street and Claire's White Nail Art Pen, and some stalks using Claire's Jade Green and Barry M Spring Green. On the accent nail, I used Born Pretty Store's heart-shaped rhinestones as the cherry fruit, rather than painting them :D
And there we are! Because it's a nude base, it reminded me of cherry pie :D
Here is the wheel of Heart Shaped Rhinestones, they come in 12 different colours, and you get around 30 of each colour, I'd say:
Here is the picture they use on the website:
As you can see, the stock picture is rather misleading regarding the amount of rhinestones you actually receive. where the stock picture is jam-packed, the reality is you probably only get half that amount - if that. Nowhere in the item description does it specify how many rhinestones you will receive. This is really the only criticism I have here, as they really are a great product, some people may be disappointed, however.
The packaging is a good idea, the top of the wheel rotates round to reveal each segment at a time, however the rhinestones do become statically charged, and stick to the top, which leads to the colours getting all mixed up. It doesn't really bother me, as I still think it's a better method of storing them than having them stuck to a sheet of acetate, like the Kiss ones I bought from Superdrug.
The hearts really are sweet, and are a great alternative to regular circular rhinestones - I love them! They're the perfect size, around 2mm, and the range of colours mean you can literally incorporate them into any design.
The wheel costs $3.33 (£2.06), with free shipping, which is fantastically cheap considering the quality and amount you get (even if you are misled in the stock picture!). They also get cheaper the more wheels you buy, for example, if you buy ten wheels, you get a 10% discount.
These took around 2 weeks to reach me in the UK, I'm not sure how long it would be for anywhere else in the world, but the website says to allow up to 4 weeks. The service is great, though, and there's always someone on the email who is quick to reply to enquiries you might have.
To pick up your own set, or check out some more cheap nail art supplies, you can click on the banner at the side of this page :D
Let me know what you think of the nail art, guys! xxxx
*This product was provided by the retailer for review. I am in no way influenced by any affiliation with the company. All opinions are my own, and honest. For full details please read my disclosure policy page
I was sent some of their heart-shaped rhinestones to try out,* and was struggling to think of a design to incorporate them into. I've wanted to do a Manicure along these lines for a while, using cherries, and thought I may as well use some of the red heart rhinestones :D
I started with a base of American Apparel Palm Springs, a lovely peach nude, and used a dotting tool to add some red dots in Boots 17 Knockout Red. I added some highlights and shading with Nails Inc Shoreditch High Street and Claire's White Nail Art Pen, and some stalks using Claire's Jade Green and Barry M Spring Green. On the accent nail, I used Born Pretty Store's heart-shaped rhinestones as the cherry fruit, rather than painting them :D
![]() |
| With Flash! |
And there we are! Because it's a nude base, it reminded me of cherry pie :D
Here is the wheel of Heart Shaped Rhinestones, they come in 12 different colours, and you get around 30 of each colour, I'd say:
| my own photo |
| my own picture - much less in there! |
![]() |
| stock picture |
As you can see, the stock picture is rather misleading regarding the amount of rhinestones you actually receive. where the stock picture is jam-packed, the reality is you probably only get half that amount - if that. Nowhere in the item description does it specify how many rhinestones you will receive. This is really the only criticism I have here, as they really are a great product, some people may be disappointed, however.
The packaging is a good idea, the top of the wheel rotates round to reveal each segment at a time, however the rhinestones do become statically charged, and stick to the top, which leads to the colours getting all mixed up. It doesn't really bother me, as I still think it's a better method of storing them than having them stuck to a sheet of acetate, like the Kiss ones I bought from Superdrug.
The hearts really are sweet, and are a great alternative to regular circular rhinestones - I love them! They're the perfect size, around 2mm, and the range of colours mean you can literally incorporate them into any design.
The wheel costs $3.33 (£2.06), with free shipping, which is fantastically cheap considering the quality and amount you get (even if you are misled in the stock picture!). They also get cheaper the more wheels you buy, for example, if you buy ten wheels, you get a 10% discount.
These took around 2 weeks to reach me in the UK, I'm not sure how long it would be for anywhere else in the world, but the website says to allow up to 4 weeks. The service is great, though, and there's always someone on the email who is quick to reply to enquiries you might have.
To pick up your own set, or check out some more cheap nail art supplies, you can click on the banner at the side of this page :D
Let me know what you think of the nail art, guys! xxxx
*This product was provided by the retailer for review. I am in no way influenced by any affiliation with the company. All opinions are my own, and honest. For full details please read my disclosure policy page
Twist on the Traditional Leopard Print Look
I say "The Traditional" leopard print like animal print nails are the most common thing in the world, but here in the UK at least, you still don't see them that often! I love a leopard print manicure, it's so eye-catching, and there's so many different colour combinations to try out. Today is a grey and silver combo, and my first time doing leopard print with the Konad M57, as opposed to my usual freehand technique - which do you think is better?
All photos are in natural light, no flash. I started out with 2 coats of Urban Oufitter's Sparkle and Fade in Light Grey, and then stamped the leopard print image from Konad M57 using Konad Black Special Polish. Does anyone else find this relly messy to work with?! I find it gets eeeeverywhere and my hands always end up covered in it haha! Maybe I just need to improve my technique! I added silver dots to the centre of the circular designs using Claire's Silver Nail Art Pen. I finished off with 2 coats of Seche Vite Topcoat.
What do you think? What other colour combos would you try? I'm dying try a neon one!
x
![]() |
| moley moley moley moley |
All photos are in natural light, no flash. I started out with 2 coats of Urban Oufitter's Sparkle and Fade in Light Grey, and then stamped the leopard print image from Konad M57 using Konad Black Special Polish. Does anyone else find this relly messy to work with?! I find it gets eeeeverywhere and my hands always end up covered in it haha! Maybe I just need to improve my technique! I added silver dots to the centre of the circular designs using Claire's Silver Nail Art Pen. I finished off with 2 coats of Seche Vite Topcoat.
What do you think? What other colour combos would you try? I'm dying try a neon one!
x
Labels:
Black,
Claire's,
Grey,
konad,
Konadicure,
Leopard Print,
M57,
Nail Art Pen,
Sparkle and Fade
Subscribe to:
Posts (Atom)