Showing posts with label Gradient. Show all posts

Pink Wednesday: Two OPI's And A Little Crack

Good Morning,

Today is pink Wednesday. I was looking through my stash and realized I don't have very many pinks.  Just last week or so I picked up two pinks from OPI Nice Stems Collection.  Be A Dahlia Won't You and I Lilly Love You.  In my opinion I thought these were the winners in the collection.  

Be A Dehlia Won't You is a shimmering foil fuchsia Pink.  It really shines on the nail.  I Lily Love You is truly amazing.  It has multi flakies and glitter in a tinted clear pink base.  It is excellent for a gradient mani and so easy to do as you see on my ring finger.  I need to do a full gradient mani with this.  I love it so much I bought a backup bottle. Lol! *-*


On my dominant hand I wanted to see what Sally Hansen Crackle Overcoat: Fuchsia Shock would look like.  I am so pleased with it.  It's very subtle which would be perfect for those that aren't into the crackle phase.  Will have to do a full many with the crackle as well.


I hope you didn't mind all the pictures.  What pink are you wearing today? 


Until next time please have a great nail polish day. (✿◠‿◠) Share/Bookmark

Tiger Nails - Tutorial!

Well, my exams are finally over! Wooooohooooo!!!! Back to regular posts! I promised I'd be back on form with the nail art, with a bang, so today I've got a tutorial for you, for FIERCE tiger nails!


This looks complicated, but its really very easy when you break it down into steps! For the base of the tiger print design, I used the sponging technique to make a colour gradient. The only piece of equipment you will need for this, is a piece of sponge, I use the corner of a kitchen scrubber:


Select 3 polishes in "tiger" colours -  I am using Nails Inc Candy Orange , Essence Show Your Feet in Juicy Orange, and Miss Sporty Taxi:


I started with the middle shade, Candy Orange, and sponged on the darker shade, Juicy Orange, onto differing areas of the nail. It works best if you dab a small amount of polish onto the sponge, and lightly build up the sponged area, adding a little bit at a time. I then did the same with the yellow, Taxi, and these are the results:


After cleaning up the cuticles with a cotton bud and nail polish remover:

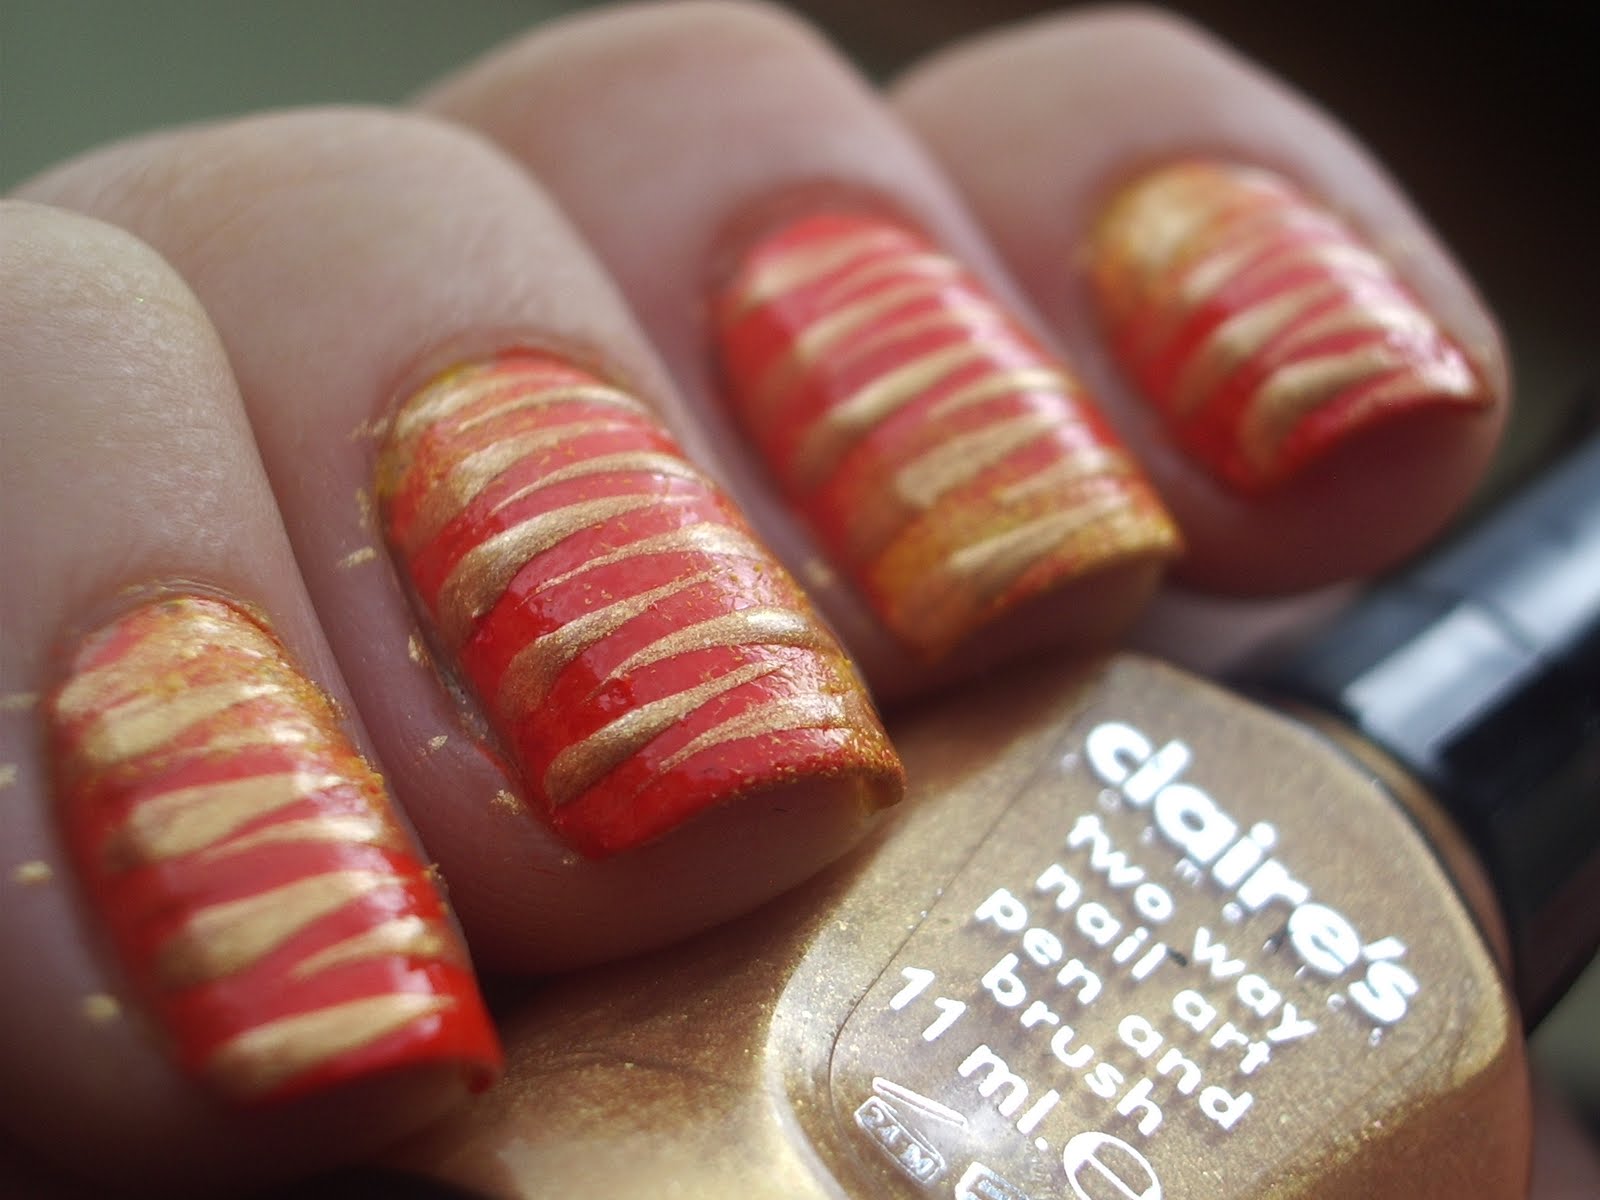
Next comes the stripes, I did two sets of stripes in black and gold, but you could just do the black if you wanted. I used Claire's Nail Art Pens in Black and Gold (the striping brushes inside), but you could easily use a striping brush or regular brush and polish if you don't have pens:


get a small bead of polish on the end of the brush, and starting at the nail edge, draw horizontal stripes that don't touch, but interlock to make the tiger print, zig zag pattern. It works best if you almost flick the striper towards the centre of the nail, as it makes a neat, tapered point. Start with the Gold stripes.


Once it's dry, you can go back with the Black striper, almost exactly on top of your gold stripes:


Add a coat of Seche Vite or your favourite topcoat, and you're done! I added the tiger face as an accent on the ring finger. Take an eyeshadow applicator (as the sponge is smaller and denser!) and add a small amount of white polish. Dab on the orange base like so:


Next, take a green, pink, grey and brown polish . with a dotting tool or brush, add two green dots to the bottom of your white sponged eye areas, and with the pink polish, draw a 'T' shape towards the nail edge. Contour the tiger's nose with two fine lines in brown polish. I added some grey whiskers with a fine brush.


All that's left to add is the black details, for which I used Claire's Black Nail Art Pen. Add your topcoat. You're all finished! Longest. Tutorial. Ever! Rest your tired eyes.


I hope you like them! Let me know what you think! Will you be trying it?

xxx

*EDIT* Because this post took BLOOMIN' AGES, I completely forgot to mention the reason I did this manicure in the first place! I knew Swaffie Blog was having an "inspired" competition, and I really wanted to enter. I was watching a documentary on endangered species, and decided to let the segment on Bengal Tigers be my inspiration! Here is the link to the competition, you can vote for me if you want my love and affection forever and ever and ever, I would really appreciate it :D:D. I am entry number 3! There are some fantastic entries, and you can vote for your favourite three, which I think is a great way of doing it, giving everyone a fair chance! :D


Stars, Skulls, Swirls, Sponging and Stamping. (Giveaway Winner, too)

God, I love it when an alliterative post title comes together.

The whole shabang for you today, I went a little stamp crazy...

All photos in natural light
Please ignore the smudge-tasic index finger! After all that work, there was no way I was re-doing it haha!

I'd been wanting to use the Skull image from the new Bundle Monster Image Plate set for a while, but was in danger of utilizing it to create some kind of gross emo-dream/Pirates of the Caribbean tribute! I decided, in the end, to keep the colours light, and add some swirly pattern and some stars :D

I started with a base of Barry M Turquoise, and sponged on Models Own Blooboo in differing places on the nail. I then repeated this with Silver, from Claire's Silver Nail Art Pen. Now, I've mentioned this before, but however wonderful this silver is (and it is), it gives you the WORST glitter herpes ever. You can scrub and scrub at your silver-stained cuticles but it Just. Won't. Go. Away. So, I apologise for the sparkly cuticles haha! I also added a little bit of Rimmel Sky High to the sponged base too :)

After adding a coat of Seche Vite to smooth it out, I stamped the swirly, planty image from BM225 using Konad White Special Polish onto different parts of each nail. Then, using THIS method, I mixed my own pastel Special Stamping Polishes and stamped some pink, green and purple Skulls from plate BM211. I then did the same with the Star image from BM206, adding them sporadically to make a pattern. I added some coloured rhinestones to the Skull eyes (a later addition - I liked it without, too) that you can get from Nail Art online store Born Pretty.


If people like this look, I may do a sponging/stamping tutorial, because it looks rather busy and difficult, but it's really very simple, when you know how!

Also, I'm going to quickly announce the Giveaway winner (I know it's been a long time coming, soorrryryyyy).
I have contacted her and she's accepted, the winner is...

Lily over at Beauty's Bad Habit!

Congratulations! I'll be posting your goodies after my exams (next week :D)

I used Random.org to select a random number, then simply found that numbered entry in my spreadsheet!

(Didn't want to include your email, Lily!)

So, there we are! My first Giveaway, over and done with! As you can see I had a colossal amount of entries, so they took a while to verify - thank you for your patience, and for entering in the first place!

I hope you enjoy your prize Lily, check out her blog Beauty's Bad Habit!

I also got some great feedback from the giveaway question "What would you like to see from me in the future", so I'll be sharing some of the suggestions with you soon! 

Thanks Everyone!

BundleMonster Contest Entry

If you haven't heard, BundleMonster (the creator and distributor of the Image Plates I use to create some of my designs) are having a Nail Art competition over at their Facebook Page. There are 25 sets of their NEW image plates up for grabs for those with the most "likes"! Voting opens on the 13th, and I would REALLY appeciate it if you could wander over, take a look at my entry (and the others of course) and see if I deserve a thumbs up! I implore you to enter yourself, too, what have you got to lose eh?

Here is my entry, you had to use Bundle Monster products and I wanted to submit something that showcased some skill, as opposed to just a simple painted base and stamped image, so I whipped the pan scrubbers out and did a pink to purple, sponged gradient base. I hope to do a sponging tutorial in the near future, as it definitely requires a "knack" and I think some people might benefit! I then stamped the flower image from BM16 in pastel blue.

I started with two coats of Barry M Strawberry Ice Cream, then painted a blob of MUA's Medium Pink Shade onto a small piece of sponge that I cut from a standard, kitchen pan scrubber. I then repeated this on the tips with Barry M Ltd ed. for Boots.


Now, I needed the stamped image to be very opaque, and I don't own Konad Special Stamping Polish in Pastel Blue, but I DO own the White - I'm going to quickly show you how I mixed my own Blue stamping polish:

I started with The Konad Special Polish and Barry M Cobalt Blue. I then popped a blob of each onto the image on BM16, next to each other (as opposed to on top of each other) so as not to gammy up the brushes:
I then used a paintbrush to swirl them together, you can create a cool gradient image if you only mix them up a  little bit.
Make sure you still do this mixing quickly, as if the polish begins to dry on the plate, it will be difficult to scape and stamp a complete image. Once you've scraped off the excess polish, and rolled your silicone stamp over it, you're ready to stamp the image in Pastel Blue:
BOOM! The stamping polish world is now your oyster -you can literally do this with any coloured polish to mix your own pastel Special Polish - this will save you splurging on all the different coloured Pastels that Konad offer, because you can still get a good quality, opaque image when using this technique. Cool!


I added clear Rhinestones to the accent nails with Nail Glue, silver dots to the centre of the flowers with Claire's Silver Nail Art Pen and then added 2 coats of Seche Vite - what do you think, was this good enough to be entered into the Bundle Monster comp? Some of the designs over there are really good, but my nails just aren't long enough to do something fancy-pants with lots of different stamps. I really like how a gradient Mani looks - I get asked if they're Minx all the time!

Don't forget I have Giveaway going on! Win yourself some sexy stuff!

PEACE OUT


Starry Eyed - Sponging and Stars!

I really was very uninspired last night, and started with a base of Model's Own Blooboo. Anyone else get bubbles with this polish? Maybe it's the way I apply it, but it happens with this polish more than any other. Here is Blooboo on its own:-

It is a lovely Pastel Blue Cream, but it has a lovely royal blue shimmer in the bottle that doesnt translate onto the nail, not even a little bit.

I decided to sponge on some silver using Claire's Silver Nail Art Pen -  I really like this silver, it's very sparkly and metallic, almost like it's made up entirely of teeny tiny bits of glitter.


Nice gradient going on there! Looking a bit wintery, like I should be adding some snowflakes! I added some purple stars instead: -


I've got a bad case of glitter herpes from the Claire's Silver, it's an absolute bugger to clean up, I can't for the life of me get it all off! I stamped the starry image from BM21 with Claire's Matte Purple. I'm never using this polish to stamp with ever again, although nice and opaque, it just dries far too quickly and I struggle to pick up/transfer a complete image - which is a shame. I wish I'd used something like Barry M Cobalt Blue instead, but by the time I'd realised, I was past the point of no return!
It still turned out alright, but it's not my favourites. It looks much better from a distance, in a dim light - much like most men.

Let me know what you think everyone!


Tropical Crackle

Well it's looking like the sunshine is getting me in the mood for summer - I tried the sponging technique for the first time today, creating a gradient from pink to yellow through orange. Heres how it came out!
I did this late last night, so sorry for the shoddy photography and lack of clean up!
I was suprised just HOW EASY this was to create, and it takes no time at all. Firstly, I painted two coats of Barbara Daly for Tesco in Neon Pink, then cut a little bit of sponge off a pan scrubber. I painted a bit of Barbara Daly for Tesco in Salsa to about halfway down the nail. If I were do it again I think I'd sponge in white first, then over the top in orange, just to get a more pronounced effect. I then sponged the tips in Miss Sporty Taxi! to complete the gradient. I love how Beachy this looks :D like a Cosmo cocktail!!
I love the Barry M Nail Effects Crackle Polish, but because the crackles have been so relentlessy blogged about recently, I havent done a post. But...I added it to this look :D

It annoyed me that theres a big black patch of crackle on the middle finger, would've liked to see it crack up a bit more, but oh well. I would have loved to top it all off with a couple of coats of Seche Vite, just to smooth the whole thing out, but I don't yet own the holy grail of topcoats. This looks great from a distance, as it's a really neat fade out. I'd like to do this base and then freehand some black palm trees in, like a tropical sunset, but alas! I am still waiting for my nail art brushes from Evilbay.

CANNOT ACTUALLY WAIT for the Models Own Crackle range - I need that Plum and the Turqouise.

Stay safe homies x

Blog Archive